SF-Peening Machine
Price range: £270.50 through £324.50
A high quality peening machine from SCHWEIGER FULPMES GMBH in the Austrian Tyrol region.
A peening machine is useful for scythers who peen a lot in a year, groups with multiple blades to peen and for people who need to peen quietly.
The peening machine comes with a hand lever as standard. A foot pedal can be added, allowing both hands to be free to support the blade. Wooden bench not included.
Scroll down for more information
Description
A peening machine developed by SCHWEIGER FULPMES GMBH
The peening machine thins the blade edge by squeezing it between the peening jaws. The depth and pressure it squeezes at can be adjusted to achieve a range of blade edge finishes.
The peening jaws are operated by a hand lever (fitted as standard). Optionally, a foot pedal can be added to operate the peening jaws instead.
The peening machine squeezes around 12mm (0.5″) of the length of the blade edge at a time, meaning the blade can be moved along about 10mm at a time. This can make it faster then hand peening, especially when the foot pedal is used, as both hands are free to support and move the blade.
This machine is capable of putting a fine grass edge on a blade, equivalent to free hand peening, and is used by many competition scythers in Europe.
It is a significant investment so is likely to be most useful to people who peen a lot eg people mowing large areas, contract scythers, teachers, volunteer groups managing multiple blades. As it is virtually silent in operation it can be useful for people who need to peen in more populous areas, whose neighbours may be disturbed by the noise of hand peening.
NOTE:
Whilst a peening machine can be a viable alternative to jig or freehand peening, it still requires a good understanding of the principles of peening and some development of skill to be used effectively.
FAQs
You can learn more about peening:
- in our Peening Guide.
- in the book Learn to Scythe
- in brief on a Introductory Scythe Course.
- in detail on Peening and Sharpening Workshops
- from other tutors via the Scythe Association of Britain and Ireland
Before using a peening machine it is useful to get a good grounding in the principles of peening from the following sources:
- The book Learn to Scythe
- An Introductory Scythe Course. or, more in depth on a Peening and Sharpening Workshop
- on the Scythe Masterclass
- from the videos of Phil’s Peening Masterclass at the Scythe Festival in 2011.
Specific instructions on the use of the peening machine:
- Basic instructions for using the machine can be found in the manufacturer’s instructions in English
- Richard Toogood has produced this useful video (though please read the note below on the adjusting pin)
Note on the use of the Adjusting Pin
 At the time Richard made his video he did not know how the adjusting pin is used so he uses a different method to achieve the same end.
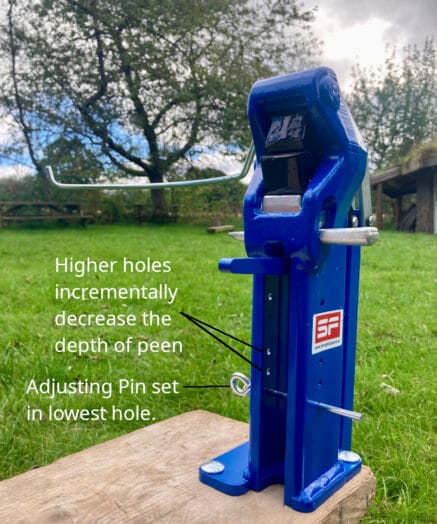
The adjusting pin can be used to quickly change the depth of edge peened, allowing a variation in edges.
- When placed in it’s lowest setting it produces a wide, thin edge suitable for grass mowing.
- Use mid-settings if you need an edge that is more robust and is not thinned so far back into the blade, eg rougher grass, bracken, so called “Styria mowing”.
As standard the SF Peening Machine comes with a hand lever. This can be switched to a foot lever to allow “hands-free” operation.
Working with the Hand Lever
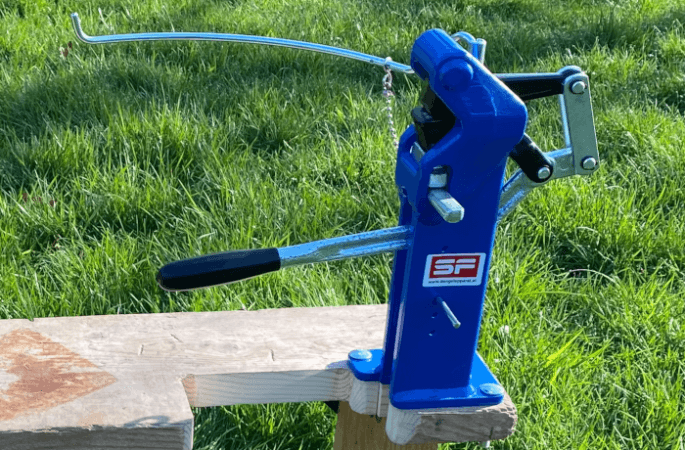
The major advantage of the hand lever is it’s simplicity.
As the default option it is easy to set up. Mounting the machine is also simplified (see “How do I mount the peening machine?” below).
Whilst it is somewhat less efficient then working with the foot lever, simplicity of set up and operation may be enough of an advantage, especially if you are peening fewer shorter blades.
Working with the Foot Lever
The major advantage of the foot lever is that it allows you to keep two hands on the blade at all time.
This speeds up the process and makes it easier to use, especially on longer blades.
When using the hand lever, you use two hands to move the blade along through the jaws, then support it with one hand whilst letting go with the other to operate the lever.
By eliminating the need to let go of the blade to operate the peening jaws, the foot lever speeds up the peening process. It also makes peening long blades (>75cm) easier as you can support the blade with two hands throughout the process.
The major downside of the foot lever is that it makes initial set up more complicated.
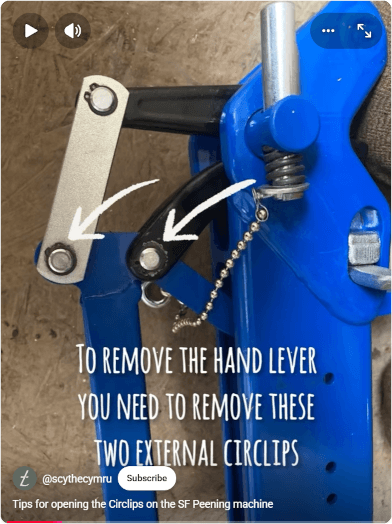
You must partially deconstruct the peening machine to remove the hand lever and switch it for the foot lever. You will need a pair of circlip pliers to do this (though these are fairly cheap to buy).
Mounting the peening machine is also more complex, as you need to create a bench that allows for the movement of the foot lever (see “How do I mount the peening machine?” below).
Hand Lever Options
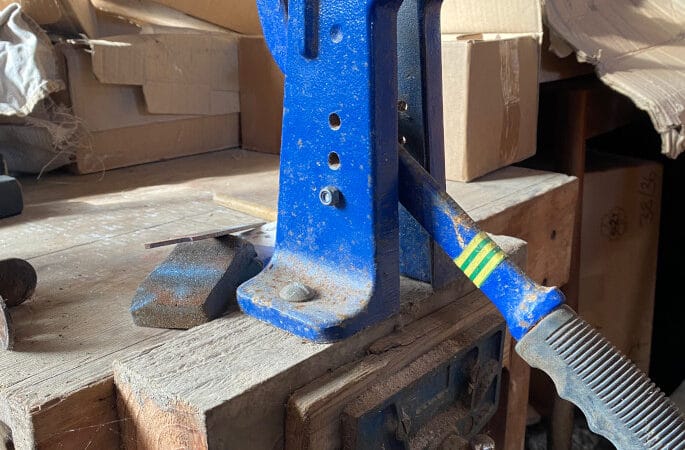 If you are only using the hand lever, the simplest mounting option is to attach the peening machine to a block of wood and hold it in a vice or workbench. It is quick and easy but you do have to stand to work.
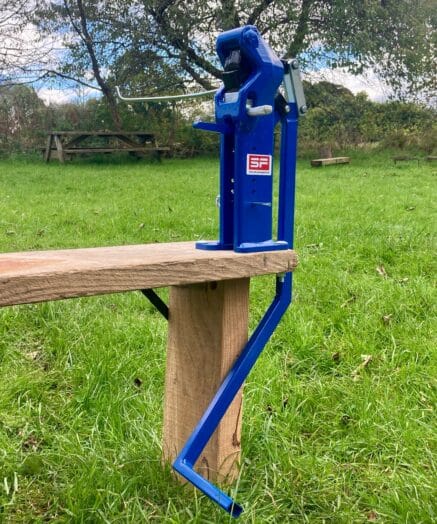
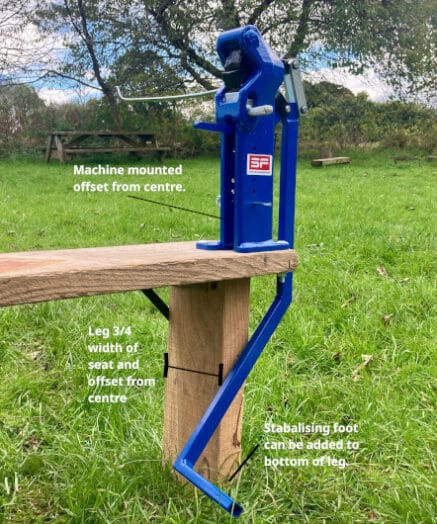
You can also build a bench so that you can sit at the machine to work. Note that you need to make a cut out in the seat of the bench to allow the hand lever to be depressed to it’s fullest extent. The peening machine is mounted offset from the centre to accommodate this.
The bench in the photo also has a modified front leg to allow it to be used with a foot lever. A full width leg can be made if you will only be using the hand lever, making the bench more stable.

Foot Lever Options
The peening machine must be mounted on a bench if you want to use the foot lever. The machine is mounted offset from the centre and the front leg of the bench is made 3/4 the width of the seat to allow the foot lever to move past the leg when it is in operation. As the peening machine is heavy the bench can end up rather top heavy and prone to falling over. To counter this, a wider piece of wood can be screwed across the bottom of the legs and extending to either side to make a stabilising “feet”.
To open the circlips you need a pair of External Circlip Pliers.
Make sure they are suitable for EXTERNAL circlips. The jaws of the correct pair will OPEN as you squeeze the handles shut (the opposite to how a pair of scissors works).
The video below shows how to remove and replace the circlips. It also includes tips on how to remove the trickier circlip that fix the pin through the black cast metal.