
Is it worth learning to peen?
Yes! Good mowing technique will only get you so far. The key to easy, relaxed and efficient mowing is a really sharp blade.
Here is the low down on peening…
…what it is and why we think it is worth taking a little bit of time to learn. Your efforts will be well rewarded!
Looking for peening videos? Scroll to the end of the guide!

The Fundamentals
There are two aspects to maintaining a sharp edge:
- Good technique with a whet stone when honing in the field
- Use of a peening jig, anvil or a peening machine to create a good blade edge profile; capable of holding a sharp edge for a sustained period of time.
Peening is the art of cold hammering the edge of the blade to draw it out and restore the ideal cutting profile.
It is also used to tailor the blade edge to the task in hand (eg ultra-fine for lawns, more robust for mowing weeds) and to repair damage to the blade edge.
VIDEO – Peening a Scythe Blade – how the peening lines develop
Repeated honing alters the profile of the blade edge.
In the field a sharpening stone is used to hone the blade edge, often as frequently as every 5 minutes.
After repeated honing with a stone the blade edge gradually becomes worn back into the thicker metal of the body of the blade. The profile of the edge is altered and it becomes less efficient at cutting. (See this informative diagram by Peter Vido)
The mower has to sharpen more frequently, the blade is not holding an edge so well and mowing is becoming harder work. It’s time to peen the blade!
Peening thins and reshapes the blade edge into a good cutting profile.
As well as reshaping the edge, the process of cold hammering the edge “work-hardens” the metal, meaning it wears more slowly and will hold an edge for longer.
It can be used to tailor the blade edge to the task in hand (eg ultra-fine for lawns, more robust for mowing weeds) and to repair damage to the blade edge
We find new blades reach their peak potential only after several passes over the peening anvil.
Getting to grips with the art of peening is a transformative moment for many mowers.
We remember the time, early on in our scything journey, when we cracked peening. Suddenly, the hay meadows that looked so large and intimidating fell easily before our blades. We were able to mow so much more in a season and mowing became a real pleasure.
The frequency of peening depends on the blade and the work it is being asked to do.

Mowing lawns and meadows require a fine, ultra-sharp edge and so more frequent peening of the blade is necessary (something like after every 4 hours of mowing.)
Less frequent peening is required when mowing rougher grass and weeds. A very fine edge is not required to mow efficiently in these circumstances and would be more vulnerable to damage.
If you are mowing a small area eg a garden your blade may only need peening once a year or less.
If you are only ever mowing rough vegetation like bracken and brambles you can get away without peening at all. A file and a coarse sharpening stone can be used to reshape the blade edge instead.
Be aware that reshaping like this will wear your blade away over time, as you will not have the peening action pulling more metal forward into the edge. You will also miss out on the work hardening of the edge.
We encourage all new scythers to peen their blades right from the start of their scything journey.

Mow with it for a few hours, then get that jig set up and have a go! It establishes the habit and actually makes things easier in the long run.
It is harder to get a blade-edge profile back to a good shape when it has been heavily used for a long time without peening.
The blade will be worn back into thick metal and repeated passes are needed to draw the metal of the edge out into a good shape. Each pass hardens the metal, making the subsequent passes that are needed a bit more difficult.
This varies, depending on the amount of peening a blade needs and the experience of the peener.
You will be slower when you are learning and will speed up with practice. With practice you can give a 65cm blade a full jig peen in less than half an hour.
If all that is needed is a quick retouch of the edge, this can be done in a few minutes by an experienced peener.
If you are only mowing rough weeds, docks, bracken and brambles it is possible to get away without peening your blade.
To manage these blades with out peening, use a file and a coarser stone to periodically re-shape the edge of the blade. This is a simpler way to create an edge with the correct profile for rougher mowing.
The edge needs to taper to a point but not be as fine and thin as an edge used for grass mowing.
Note, if you choose not to peen
you will lose out on the advantages of peening such as:
- work hardening of the edge, which allows it to hold a longer lasting sharp edge.
- the drawing out of new metal to replace that worn away by work and sharpening. This prolongs the life of the blade.
- the ease and effectiveness of mowing with a really sharp blade (particularly noticeable when mowing soft weeds and grass).
For some people, a peening service may be a viable option.
A peening service can be used for restoration of a blade that has not been peened for a long time or a once a year MOT of an otherwise well maintained blade. It is likely to be particularly useful for people with smaller areas to mow who’s blades need infrequent peening, making the investment in skill / equipment less necessary.

How to Peen
There three main ways to peen a blade:
- Using a peening jig
- Freehand peening with a peening anvil and hammer.
- Using a peening machine
Details on these methods of peening can be found below.
If you don’t want to peen yourself you can also use a peening service

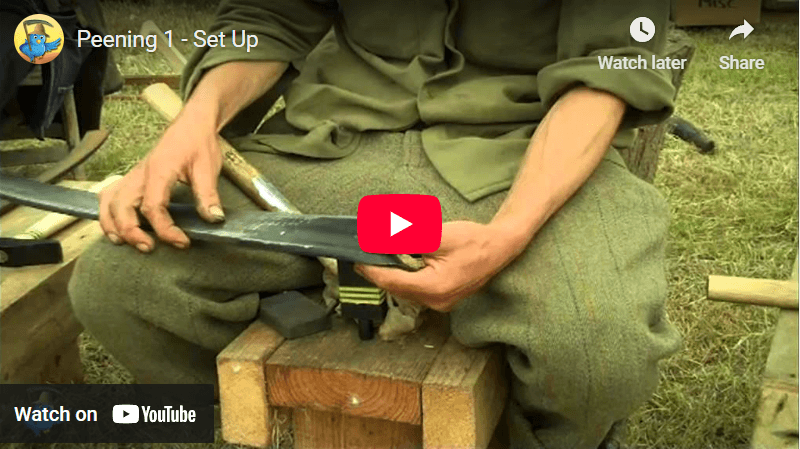
Which ever method of peening you choose you will need to mount your peening tools in some way.
The simplest system is to fix your anvil or jig into a large block of wood, which you sit next to on a stool whilst peening.
We use a simple “peening pony” in which a seat is incorporated into the jig / anvil mounting block. Your weight on the peening pony helps prevent movement caused by the hammer blows. You can tailor the height of the bench to suit your leg length, making supporting the blade with your knees during peening easy and comfortable.
Here are instructions on how to make a simple peening pony.
You will also need to pre-drill a pilot hole for the spike of your jig to fit into.
Ideally, the pilot hole for a Standard Jig would be drilled according to the diagram below.
Start with the largest diameter / shallowest depth hole (A) then progressively drill the narrower diameter / deeper holes (B then C).

If you do not have the drill bits to do all three holes…
…you can manage with just one 12mm full depth hole (or even a 10mm one, though the wood is more likely to split as you force the jig spike in.)
With either method, your pilot hole will be a tight fit for the spike.
Don’t try and force the jig fully in to begin with, it will “bed in” properly as you use it.
When seating the jig, NEVER hammer directly onto the jig post as you may deform or otherwise damage it. Place a piece of wood onto the jig body and hammer onto that.
Note:
The diameter of the spike of the Fux Deluxe Peening Jig and the Peening Anvils are different from the Standard Jig and the pilot hole dimensions will need adjusting to suit.
When mounting the peening machine, you first need to decide if you will be using it with the foot or the hand lever (for more details on the these options see “The Peening Machine” below)
Hand Lever Options
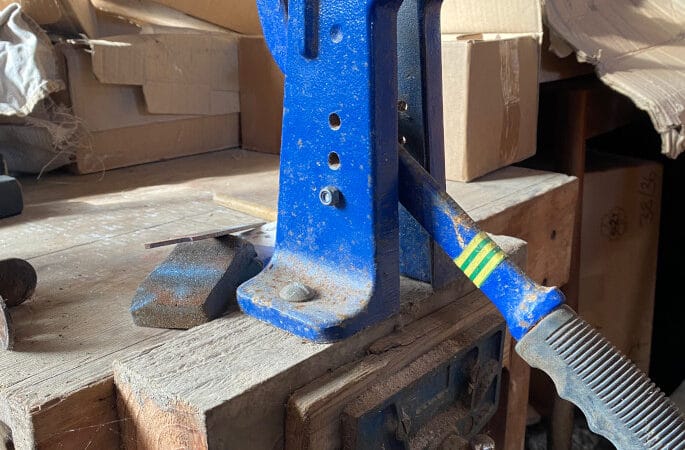 If you are only using the hand lever, the simplest mounting option is to attach the peening machine to a block of wood and hold it in a vice or workbench. It is quick and easy but you do have to stand to work.
You can also build a bench so that you can sit at the machine to work. Note that you need to make a cut out in the seat of the bench to allow the hand lever to be depressed to it’s fullest extent. The peening machine is mounted offset from the centre to accommodate this.
The bench in the photo also has a modified front leg to allow it to be used with a foot lever. A full width leg can be made if you will only be using the hand lever, making the bench more stable.

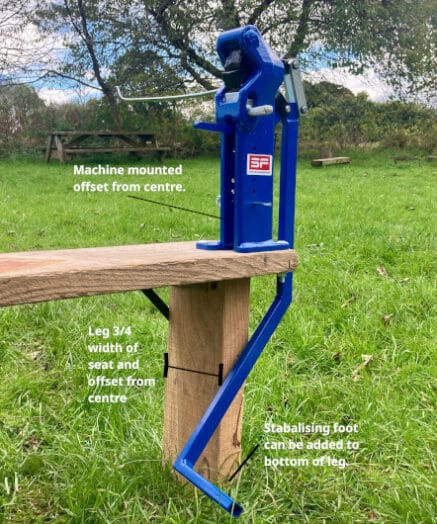
Foot Lever Options
The peening machine must be mounted on a bench if you want to use the foot lever. The machine is mounted offset from the centre and the front leg of the bench is made 3/4 the width of the seat to allow the foot lever to move past the leg when it is in operation. As the peening machine is heavy the bench can end up rather top heavy and prone to falling over. To counter this, a wider piece of wood can be screwed across the bottom of the legs and extending to either side to make a stabilising “feet”.
Deluxe Foot Lever Option
Below is a photo of a beautiful bench made for Phil by David Keugler. The foot lever has been modified to allow operation with two feet, making it easier to push straight back on the lever. As you can not brace yourself with one foot, you need a seat with a back so you do not slide back along the bench as you try and depress the foot lever. The position of this seat is adjustable to allow for the selected position of the lever and the height of the user.
We recommend wearing Ear Defenders if you are using a jig or anvil.
 Peening produces a high pitched, percussive noise. Whilst it is the distinctive sound of the scything season, it could damage your hearing if you are exposed to it a lot. Phil peens over a hundred blades in a season so ear protection is prudent!

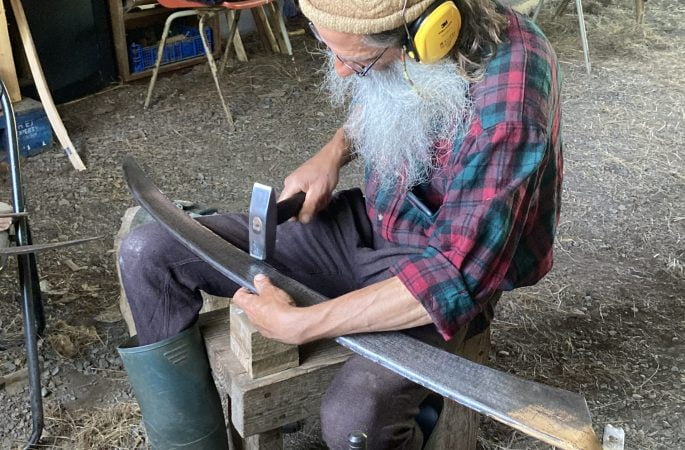
The Peening Jig
The Peening Jig makes the art of peening more accessible to the beginner.
 The jig is relatively easy to use and requires less accuracy then freehand peening. It produces good results for most circumstances, and can produce excellent results with practice.
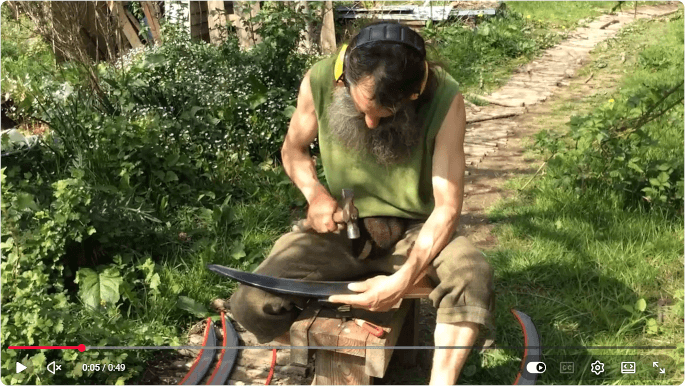
The blade is placed between the first cap and the base of the jig. The cap is struck repeatedly with a hammer as the blade is drawn through the jig producing a line of blows near the blade edge that draws out and thins the metal.
The process is repeated with the second cap, which is shaped so as to create a line of peening closer to the blade edge than the first.
Phil started peening with a jig and we recommend most people to do the same.
A Note about ear defenders.
Peening produces a high pitched, percussive noise. Whilst it is the distinctive sound of the scything season, it could damage your hearing if you are exposed to it a lot. Phil peens over a hundred blades in a season so ear protection is prudent!
- The book Learn to Scythe contains instructions on using a jig.
- We cover basic jig peening during our Introductory Scythe Course.
- We look at all aspects of peening in detail on Peening and Sharpening Workshops.
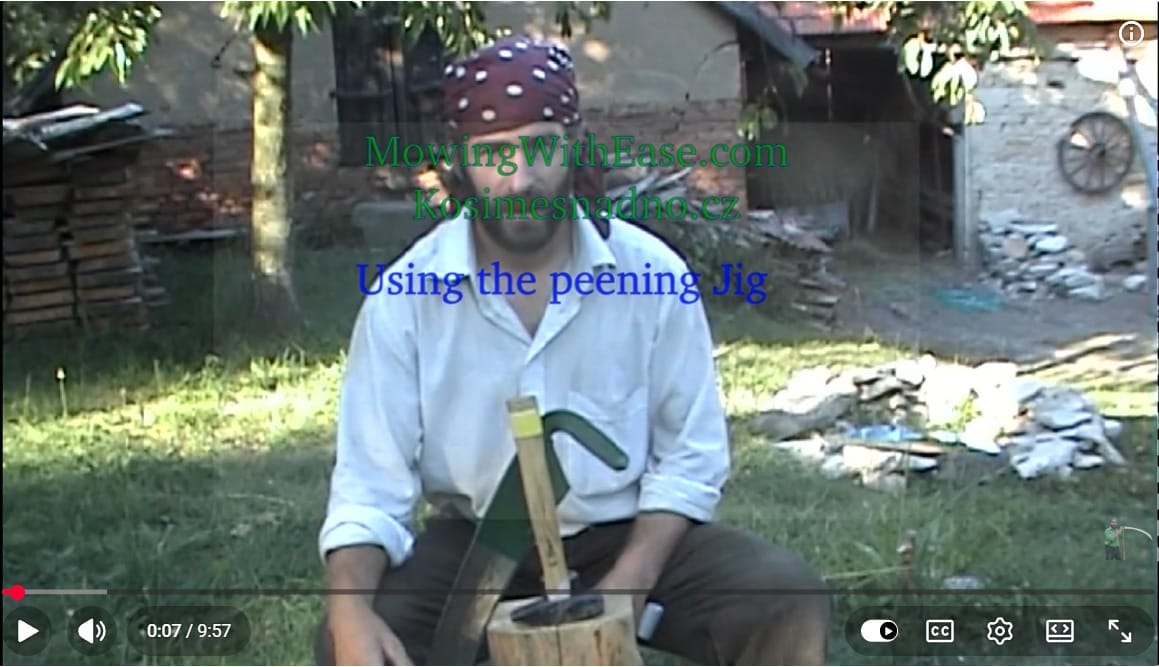
- This YouTube video by Neil Dudman is a good introduction.
With a peening jig, a standard hammer of 500 – 800g weight can be used.
The condition of the face is unimportant as it does not come into contact with the blade edge.
In general, Phil prefers to peen with an 800g hammer.
With a heavier hammer you can let the hammer fall and allow it’s weight to do most of the work. This can help increase accuracy of placement of blows and reduce fatigue.
Choosing your hammer.
We find there are two kinds of peeners:
Some people are a little timid with their hammer blows and are prone to under-peening with a 500g hammer. An 800g hammer can help in this case.
However, some people are used to “hitting” with a hammer. If you prefer to strike firmly you may find an 800g hammer causes you to over-peen the blade.
- Choose an 800g hammer if you think you are likely to strike softly, or would prefer to allow the weight of the hammer to do most of the work.
- Choose a 500g hammer if you think you would prefer to fully strike with the hammer.
Best of both worlds – use a range of hammer weights.
It is easier to get a more consistent result if you use a range of hammer weights, depending on the result needed.
A heavy hammer is especially useful when peening out a thick edge and for cap one on a jig. If you are doing a quick pass using cap two to top up an already well-peened blade, a lighter hammer is more suitable.

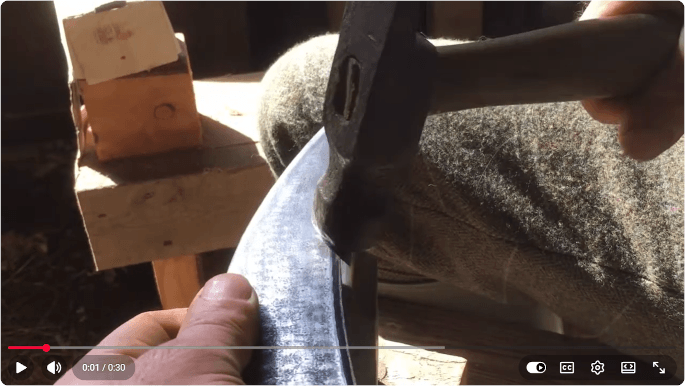
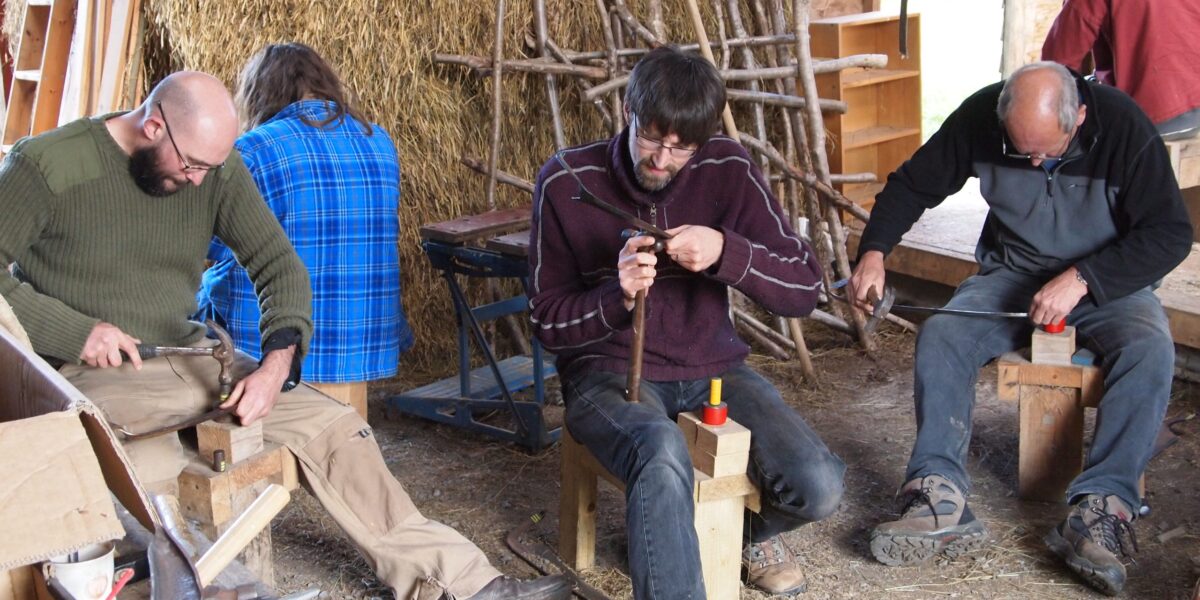
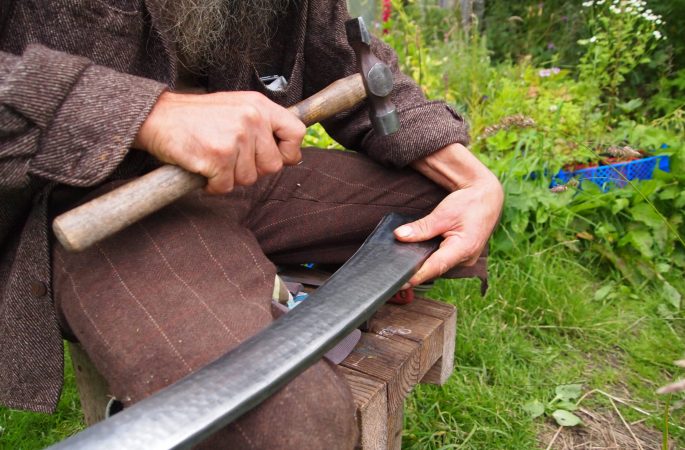
Freehand Peening
The method of free hand peening seen most frequently in the UK uses a bar peen anvil and a flat hammer.
- The flat hammer is used to hammer a line a few millimetres back from the blade edge, drawing the metal forward and thinning it.
- The process is then repeated a number of times, the exact number depending on the thinness and sharpness of the edge required.
- Each time the hammered line is placed closer to the blade edge, with the final line being on the blade edge.
It takes practice to master the accuracy of the placement of the hammer blows.
Once this has been achieved, free hand peening can produce even better results than the jig.
You can learn more about freehand peening:
- on a Peening and Sharpening Workshop
- on the Scythe Masterclass, or
- from the videos of Phil’s Peening Masterclass at the Scythe Festival in 2011 (links at the end of this guide).
Here is a video of Phil freehand peening a scythe blade. Note the ear defenders.
Peening produces a high pitched, percussive noise. Whilst it is the distinctive sound of the scything season, it could damage your hearing if you are exposed to it a lot. Phil peens over a hundred blades in a season so ear protection is prudent!
%27%20fill-opacity%3D%27.5%27%3E%3Cellipse%20fill%3D%22%23b0b1c6%22%20fill-opacity%3D%22.5%22%20rx%3D%221%22%20ry%3D%221%22%20transform%3D%22matrix(-1.98156%2029.53554%20-39.77393%20-2.66847%2033.4%2062.5)%22%2F%3E%3Cpath%20fill%3D%22%237c3812%22%20fill-opacity%3D%22.5%22%20d%3D%22M79.7%20200l-41.2-74.4%20112.8-62.5%2041.2%2074.3z%22%2F%3E%3Cellipse%20fill%3D%22%2344576b%22%20fill-opacity%3D%22.5%22%20rx%3D%221%22%20ry%3D%221%22%20transform%3D%22matrix(32.25786%20-46.48966%2020.50644%2014.22884%2073.2%2089.7)%22%2F%3E%3Cellipse%20fill%3D%22%23cb823f%22%20fill-opacity%3D%22.5%22%20rx%3D%221%22%20ry%3D%221%22%20transform%3D%22matrix(-8.57809%2013.89483%20-101.35143%20-62.57014%2099.6%209.8)%22%2F%3E%3C%2Fg%3E%3C%2Fsvg%3E) Peening with an anvil requires a specialised hammer.
Peening with an anvil requires a specialised hammer.
 Peening with an anvil requires a
The face of peening hammers must be sufficiently hardened not to dint in use and be kept smooth and shiny. Any dint or defect in the face of the hammer will be imprinted in the blade being peened.
A peening hammer should be reserved for peening with an anvil only and NEVER used with the jig, or worse yet, to hammer in nails!
Phil prefers to peen with an 800g hammer.
With a heavier hammer you can let the hammer fall and allow it’s weight to do most of the work. This can help increase accuracy of placement of blows and reduce fatigue.
We find there are two kinds of peeners:
Some people are a little timid with their hammer blows and are prone to under-peening with a 500g hammer. An 800g hammer can help in this case.
However, some people are used to “hitting” with a hammer. If you prefer to strike firmly you may find an 800g hammer causes you to over-peen the blade.
- Choose an 800g hammer if you think you are likely to strike softly, or would prefer to allow the weight of the hammer to do most of the work.
- Choose a 500g hammer if you think you would prefer to fully strike with the hammer.
We supply peening hammers or you may find a suitable hammer that can be polished up for use in your collection or at a second hand tool sale. Note the hammer must have been tempered sufficiently so that it is hard enough not to dint in use.
The face of peening hammers must be kept smooth and shiny.
Any dint or defect in the face of the hammer will be imprinted in the blade being peened.
A peening hammer should be reserved for peening with an anvil only and NEVER used with the jig, or worse yet, to hammer in nails!
Frequent polishing of the face of your hammer and anvil with a 120 grit rubberized sanding block will keep both nice and shiny.
Peening with a jig is a great way to familiarise yourself with the process, and it lessens the chance you will damage your blade as you learn.
If you want to move onto freehand peening, a good intermediate step is to use the jig to complete the first lines of peening, then finish the edge freehand.
This is the easiest line to place freehand. Practicing in this way will help you build the skills and confidence to complete the whole task on an anvil.
Here is a guide to choosing between anvil and jig peening
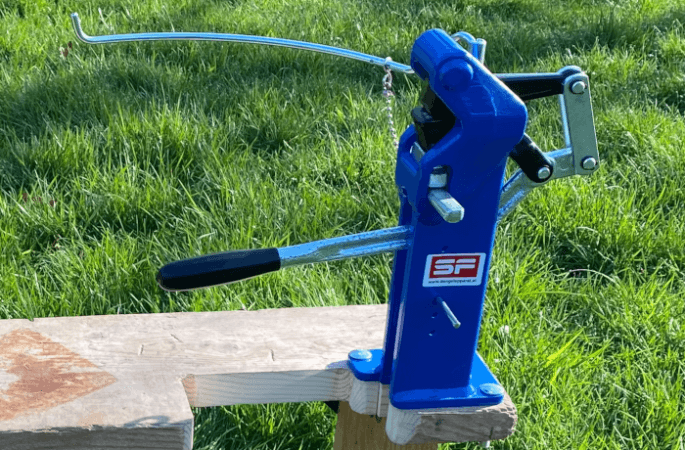
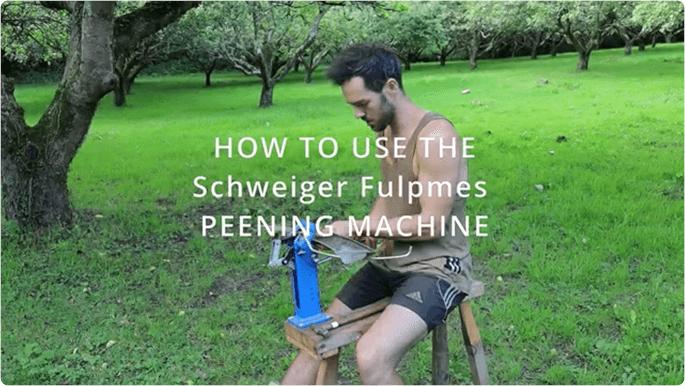
The SF Peening Machine
A peening machine thins the blade edge by squeezing it between the peening jaws.
 The depth and pressure it squeezes at can be adjusted to achieve a range of blade edge finishes.
The peening jaws are operated by a hand lever (fitted as standard). Optionally, a foot pedal can be added to operate the peening jaws instead.
The peening machine squeezes around 12mm (0.5″) of the length of the blade edge at a time, meaning the blade can be moved along about 10mm at a time. This can make it faster then hand peening, especially when the foot pedal is used, as both hands are free to support and move the blade.
This machine is capable of putting a fine grass edge on a blade, equivalent to free hand peening, and is used by many competition scythers in Europe.
It is a significant investment so is likely to be most useful to people who peen a lot eg people mowing large areas, contract scythers, teachers, volunteer groups managing multiple blades. As it is virtually silent in operation it can be useful for people who need to peen in more populous areas, whose neighbours may be disturbed by the noise of hand peening.
NOTE:
Whilst a peening machine can be a viable alternative to jig or freehand peening, it still requires a good understanding of the principles of peening and some development of skill to be used effectively.
The peening machine has several attributes that make it attractive.
Skills Required
Whilst it requires skill and understanding to set up, once that is done can be used by a wider range of skill levels. This can be useful, for example, when maintaining blades belonging to a volunteer group.
Physical properties
It is virtually silent in operation it can be useful for people who need to peen in more populous areas, whose neighbours may be disturbed by the noise of hand peening.
No concussive forces are transferred to the user so it is useful for people with joint issues who find the repeated concussive force of hammering painful.
Speed / Effectiveness
It is quicker then any of the other peening methods. On a well maintained blade a good edge can be achieved in one pass.
Because it is quicker and easy, you are likely to peen more often and keep your blade well maintained. You then spend proportionally more time mowing with a good edge.
It helps keep up with the maintenance of long blades. Phil switches to shorter blades as the mowing season progresses and the vegetation matures, hardens and is more complex to cut. By making maintenance easier, the peening machine extends the time he uses long blades .
The adjusting pin can be used to quickly change the depth of edge peened, allowing a variation in edges (lowest – grass edge, mid settings if you need an edge that is not thin to so far back into the blade “Styria mowing”).
There are some attributes of the peening machine that need to be taken into account before deciding to use one.
Skills Required
Some technical skill is needed to set the machine up initially, particularly if you opt to use the foot lever..
Whilst the skill level in use is less then other peening methods, it still requires a good understanding of the principles of peening and some development of skill to be used effectively.
Peening Limits
The peening machine can’t be used to peen very thick edges, as they won’t go into the jaws.
It is harder to make a “robust edge” (a edge that is peened and somewhat thinned but is not rippling thin) so it is less useful if most of your mowing is rough work (bracken etc)
There is no work hardening of edge, so the edge wears away somewhat quicker then a edge peened by other methods. More frequent peening is needed but since it is fast this is not too much of a disadvantage. If you have the skills, you can follow the peening machine with a freehand peen of the edge if you need more hardness.
Entry Cost
It has a higher initial investment cost which may outweigh the benefits if you only peen occasionally. We think it is worth the investment for anyone who needs to peen frequently, be that an individual mower with plenty of grass to mow, contract scythers, teachers or volunteer groups managing multiple blades
As standard the SF Peening Machine comes with a hand lever. This can be switched to a foot lever to allow “hands-free” operation.
Working with the Hand Lever
The major advantage of the hand lever is it’s simplicity.
As the default option it is easy to set up. Mounting the machine is also simplified (see “Setting up your Peening Station – Peening Machines” above).
Whilst it is somewhat less efficient then working with the foot lever, simplicity of set up and operation may be enough of an advantage, especially if you are peening fewer shorter blades.
Working with the Foot Lever
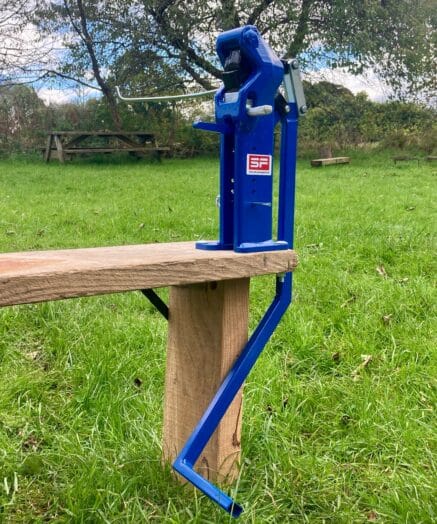
The major advantage of the foot lever is that it allows you to keep two hands on the blade at all time.
This speeds up the process and makes it easier to use, especially on longer blades.
When using the hand lever, you use two hands to move the blade along through the jaws, then support it with one hand whilst letting go with the other to operate the lever.
 By eliminating the need to let go of the blade to operate the peening jaws, the foot lever speeds up the peening process. It also makes peening long blades (>75cm) easier as you can support the blade with two hands throughout the process.
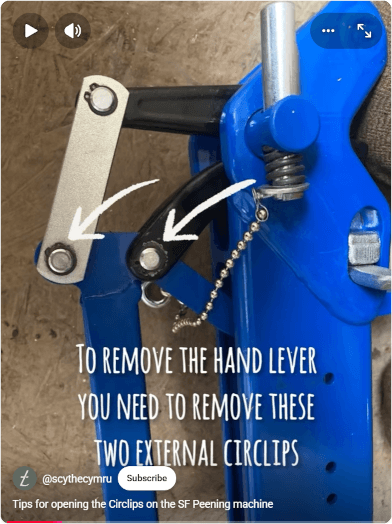
The major downside of the foot lever is that it makes initial set up more complicated.
You must partially deconstruct the peening machine to remove the hand lever and switch it for the foot lever. You will need a pair of circlip pliers to do this (though these are fairly cheap to buy).
Mounting the peening machine is also more complex, as you need to create a bench that allows for the movement of the foot lever (see “Setting up your Peening Station – Peening Machines” above).
Before using a peening machine it is useful to get a good grounding in the principles of peening from the following sources:
- The book Learn to Scythe
- An Introductory Scythe Course. or, more in depth on a Peening and Sharpening Workshop
- on the Scythe Masterclass
- from the videos of Phil’s Peening Masterclass at the Scythe Festival in 2011 (links at the end of this guide).
Specific instructions on the use of the peening machine:
- Basic instructions for using the machine can be found in the manufacturer’s instructions in English
- Richard Toogood has produced this useful video (though please read the note below on the adjusting pin)
Note on the use of the Adjusting Pin
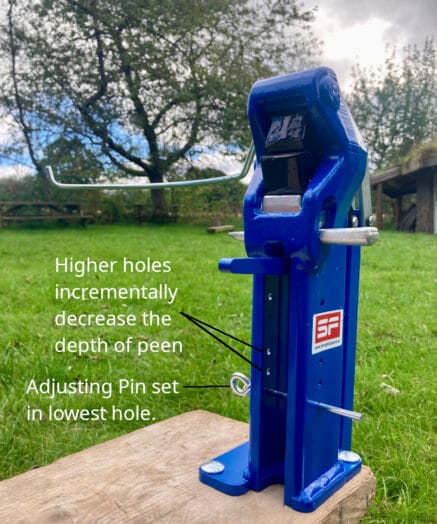 At the time Richard made his video he did not know how the adjusting pin is used so he uses a different method to achieve the same end.
The adjusting pin can be used to quickly change the depth of edge peened, allowing a variation in edges.
- When placed in it’s lowest setting it produces a wide, thin edge suitable for grass mowing.
- Use mid-settings if you need an edge that is more robust and is not thinned so far back into the blade, eg rougher grass, bracken, so called “Styria mowing”.
Peening Best Practice
As you can see from the above, there are many ways to keep your blade sharp and cutting well!
But what do we recommend?
For many people, a simple peening jig set will be all they will ever need. It is relatively cheap and easy to learn but will make a big difference to the cutting ability of your blade.
If you want to take your edge care to the next level…
…use a jig for the bulk of your peening lines and learn to freehand peen the edge. The edge is the easiest freehand line to learn to do. Doing so opens up greater opportunities for fine tuning your edge so that it slices with ease.
If you mow large areas or work with groups…
…consider investing in a peening machine. The increased ease and speed means you will peen more and spend more time mowing with a blade in good condition. This can offset the initial investment.
For some people, a peening service may be a viable option.
It is likely to be particularly useful for people with smaller areas to mow who’s blades need infrequent peening, making the investment in skill / equipment less necessary.
Peening Videos
TO COME:
Using the adjusting pin on the SF Peening Machine
Videos of Phil’s Masterclass on Freehand Peening (2011)
More Information

Thank you – very good and useful tutorial. I’m out to sharpen right now.